
Creating a New Asset Subtype

It is possible to create an additional asset subtype alongside "IT Assets" or "Vehicles". A subtype allows you to create a table with all the columns of the Assets table.

How to Create an Assets Subtype

  1. Select the Designer button at the bottom of the Sidebar.

A screenshot that shows the location and appearance of the Designer button at the base of the sidebar. The button's icon resembles a ruler and a set square. The screenshot is annotated with a red box to highlight the button.

  1. Press the + Create Table button in the Command Bar
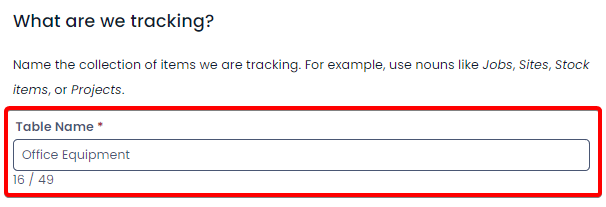
A screenshot that shows the location and appearance of the "Create Table" button on the Designer Tables page. The screenshot is annotated with a red box to highlight the "+Create Table" button.

  1. Enter a table name

A screenshot that shows where to enter the name of a table when creating a new table. The title of the section reads: "What are we tracking?" The screenshot is annotated with a red box to highlight the "Table Name" field, which in this example includes the typed name: "Office Equipment".

  1. Check the Create Sub-Type checkbox
  2. Click the Extends Table dropdown and select Assets (or type your selection into the field instead)

A screenshot of the "Create Sub-Type" section of the create table page. The screenshot is annotated with a red box to highlight the fact that the "Inherit and combine" box has been ticked. In this example, the user has typed and entered "Assets" into the field underneath titled "Extends table".

  1. Choose an appropriate icon

A screenshot of the "Icon" section of the create table page. There is a search bar, and in this example the user has typed "print". This has produced a series of icons such as "printer", "thumbprint", "printfaxfile" and "sprint". The user has selected the "print" icon, which appears next to the search bar with the word "selected".

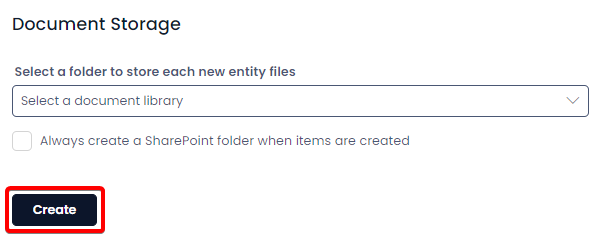
  1. If you want to store files against these items, then you should select document storage location. This will connect to your site's sharepoint.

  2. Press Create

A screenshot depicting the "Document Storage" and "Create" buttons at the bottom of the create table page. In this example, the user has not selected any document storage, so the field simply reads: "Select a document library". The "Always create a SharePoint folder" checkbox has also been left unchecked. At the bottom of the screen is a navy button with white text that reads: "Create". The screenshot is annotated with a red box to highlight that the user must press this button in order to create the table.

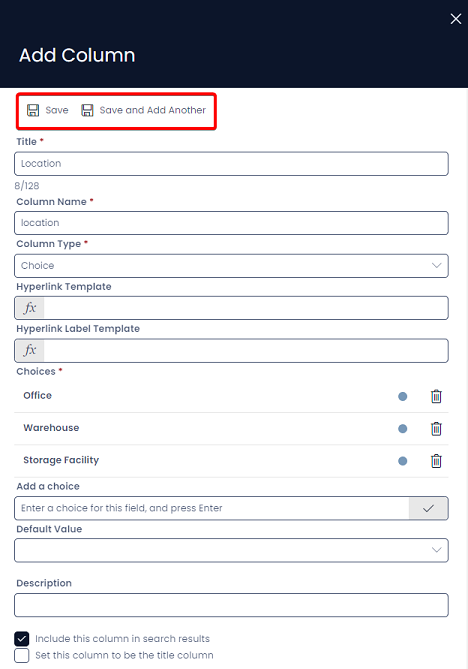
  1. Add any relevant columns to the table for the additional data you wish to capture. In this example we will add a choice field called Location. This data represents where the equipment is located. For more information on creating columns and column types see the following documentation on Creating Columns.
Adding Columns

This process is briefly explained at the end of this article.

  1. Press Save

  2. Add your new table to the Explorer Sidebar (to see more details on how to do this see Customising the Sidebar)

Adding New Columns to a Subtype

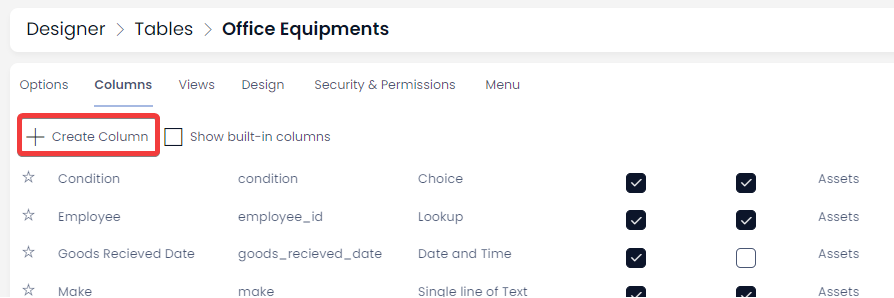
  1. While viewing a table in Designer, press the Columns tab in the Tab Strip

A screenshot showing the location and appearance of the "Columns" tab at the top of a table page in designer. The screenshot is annotated with a red box to highlight the location of the tab.

  1. Press + Create Column

A screenshot showing the location and appearance of the "+ Create Column" button in the Command Bar of Designer. The screenshot is annotated with a red box to highlight the location of the button.

  1. Enter the relevant details

  2. Press Save or Save and Add Another

A screenshot depicting a user who is creating a column titled "Location". The screenshot depicts the "Add Column" create screen that appears after the user clicks the "Create Column" button in designer. Each of the following fields has data entered: "Title: Location", "Column Name: location", "Column Type: Choice". In the "Choices" section, the following choices have been added: "Office", "Warehouse", and "Storage Facility". The screenshot is annotated with a red box at the top of the "Add Column" create screen, to highlight the importance and location of the "Save" and "Save and Add Another" buttons.